|
| Keyport Pivot and Slide 3.0 |
I have had the
Keyport Slide 2.0 since 2013. In January of this year, the folks at Keyport introduced a
Kickstarter campaign for their new Slide 3.0, along with a newly designed Pivot.
 |
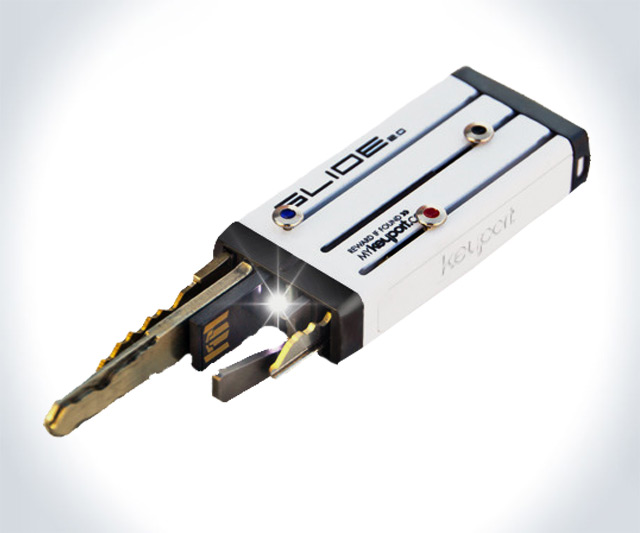
| Keyport Slide 3.0 |
So far, I am/was very happy with the Slide 2.0. Although, there were issues with the construction...mainly material choice...the plastic used could shatter if dropped. Ask me how I know that one. The aluminum construction of the Slide 3.0 (will hopefully) solve this minor issue. You can see one of the chips on my 2.0 in the image below. Besides, I am not a fan of the pivot system, not just Keyport's Pivot, pivot design systems in general.
The design of the 3.0 is similar to the 2.0. There are slight changes due the change from plastic to metal. For one, the 3.0 weighs a little more. Well, of course it does, it is metal. I like the added weight.
 |
| Slide 3.0 and Slide 2.0 |
The end cap is a much improved design. It has a spring loaded latch. On the 2.0, the end cap is sort of pressed in and locks in with tabs. Well, if you happen to drop your Keyport 2.0...one of these tabs can break of...then you will have to look for your chassis, end cap, and the little piece of tab. The fun part is finding a way to re-attach or repair the broken tab. I tried superglue, solvents, welding the plastic tab back, and hot glue. They all work for a while, but as soon as you need to remove the end cap for any reason (see photo above), you risk breaking the tab off again. Oh, and if you happen to drop it again, you could get lucky and just have a chip somewhere....or you could snap the tab off again. So, you can see how excited I was when a new - metal - version was being released. Heck, at one point I thought about getting a new Slide 2.0 chassis, but luckily the Kickstarter campaign started.
One 'feature' that 2.0 users will miss when switching to the 3.0 is the little nub on one side of the Keyport chassis. I use this everyday to feel which distinguish which side is which, especially in the dark.
 |
| Slide 2.0 nub vs smooth Slide 3.0 |
Above image shows nub (circled) that has been very helpful. I may stick a little nipple on the 3.0 so I will know which side is 'up'.
Since I already had blades and inserts from the 2.0, when I got the new 3.0, I just transferred them over. I even reused by buttons. But, there was one insert that did not fit. The LED light insert is too wide to fit. I also had the problem of low battery life.
 |
| Keyport LED insert |
If you have the LED insert and need to change the battery and/or want to fit it in your Slide 3.0, this next section may help. Be careful and do this at your own risk...there is my disclaimer.
 |
| Hoverboard |
Tanget: The LED insert kinda looks like a hoverboard. And, why is it when I look up "hoverboard" on Google, I get those 'hands-free Segways'. When I search "hoverboard", I should be bombarded by images from the Back to the Future trilogy, damn it!
 |
| Trim line |
Since the insert is a little wide, you need to trim one side of the circuit board. The dotted line above shows where you need to trim to, about 1.5mm.
Be careful to not go too deep. The red arrow shows the line where 'wire' that connects the battery to the switch. Try not to cut this line. If you do, that is okay. You should be able to re-route the wire back to the switch.
 |
| Sanding to the line |
On my LED insert, there was enough room to sand down and not hit the wire. Note the holes on the circuit board, you can use these to 'rewire' if you happen to trim too much.
Now, battery removal. The batteries are spot welded on to the contacts. This is so the insert can slide in and out easily without catching on the walls of the chassis. I do not have, or know if there is, an un-spot welder. So, a solution is the drill out the spot weld.
 |
| Spot weld locations |
There are eight spot welds. Luckily, they have a slight dip, like a shallow pilot hole, so the drill bit you use should not travel as easily. Better to have access to a drill press, but drilling by hand will work.
 |
| Battery drilling |
As with all tools be careful. After all, you are drilling into to a battery. Take it slow. Once you pass through the spot weld, the contact should pop up, no need to drill any deeper. I would assume that heat from the drill on the battery is not the best combo. Speaking of heat on a battery, spot welding a battery sounds stupid dangerous.
 |
| Drilled contacts |
Once you have drilled through the contacts, the battery will pretty much fall out. Just need to find the correct replacement. The batteries that came with the insert were 3V CR1025, I used 1.55V 395. I will be getting half the voltage of a brand new LED insert, but I was getting close to nothing on my factory batteries. Good news is, I can switch out batteries anytime.
 |
| Tape down contacts to battery |
Not only do I not have an un-spot welder, I also do not have a spot welder to weld the contacts back on to the batteries. But, I have tape. Find some thin tape, cut it to size and make sure the contacts are contacting the batteries and tape everything down. Make sure there is tape on the sides...remember it was to wide to fit in the 3.0 slots?...well why would you add more thickness to it?
 |
| Slide insert into chassis |
With both one edge trimmed to fit, new batteries replaced and taped, you can now slide in the insert into the chassis as you did on the 2.0.
 |
| Lights on! |
It works!
After doing this, I realized the new design has an option for LED side plate. It looks like there is an easier way to change batteries.
 |
| New LED side plate design |
If you want one of these yourself,
you can order from Keyport.